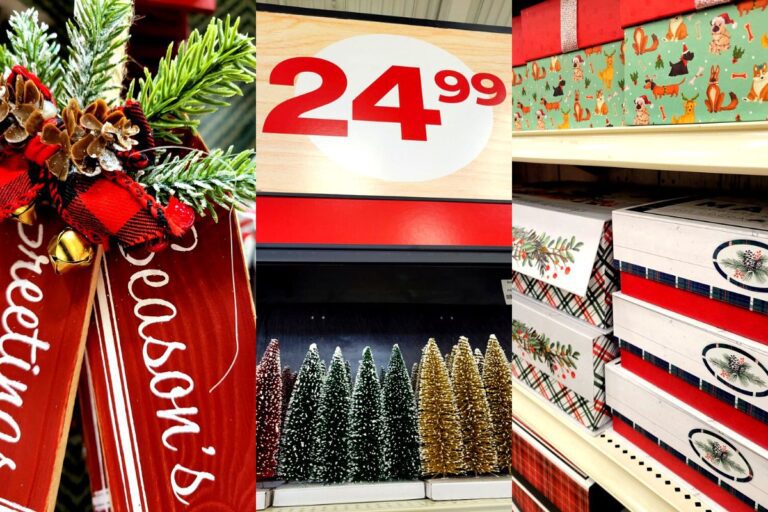
DIY Fall Decor From the Dollar Store
Fall is right around the corner. I don’t know about you but I love to decorate our home for the season with DIY fall decor that is easy to make and costs very little.
Why You Should Create Your Own DIY High End Fall Decor
Ah, fall! What’s not to love about fall? Summer is winding down, schedules are being re-implemented, cozy sweaters are being pulled out, and there is a crispness in the air that is just so refreshing.
During the summer months I like to decorate the home but tend to keep it on the simpler side. A few sea shells and succulents here and there but for the most part during the summer months I am spending time with my friends and family or I’m up for tackling bigger projects like entire room makeovers or furniture upcycling.
Fall however, is the lead up to the holidays and during the holidays. It’s time to go a little crazy. But wanting new, high end decor every year can get costly.
Fortunately, a few dollar store purchases can result in amazing high end DIY fall decor that look store bought but were actually inexpensive and quick to make.
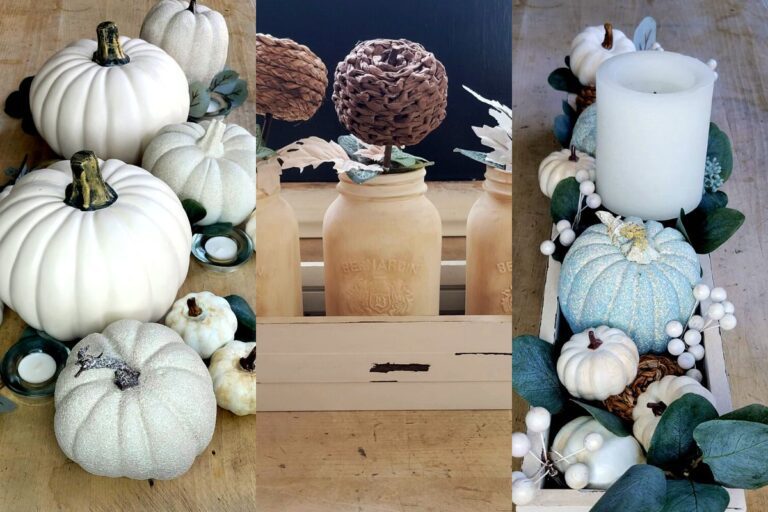
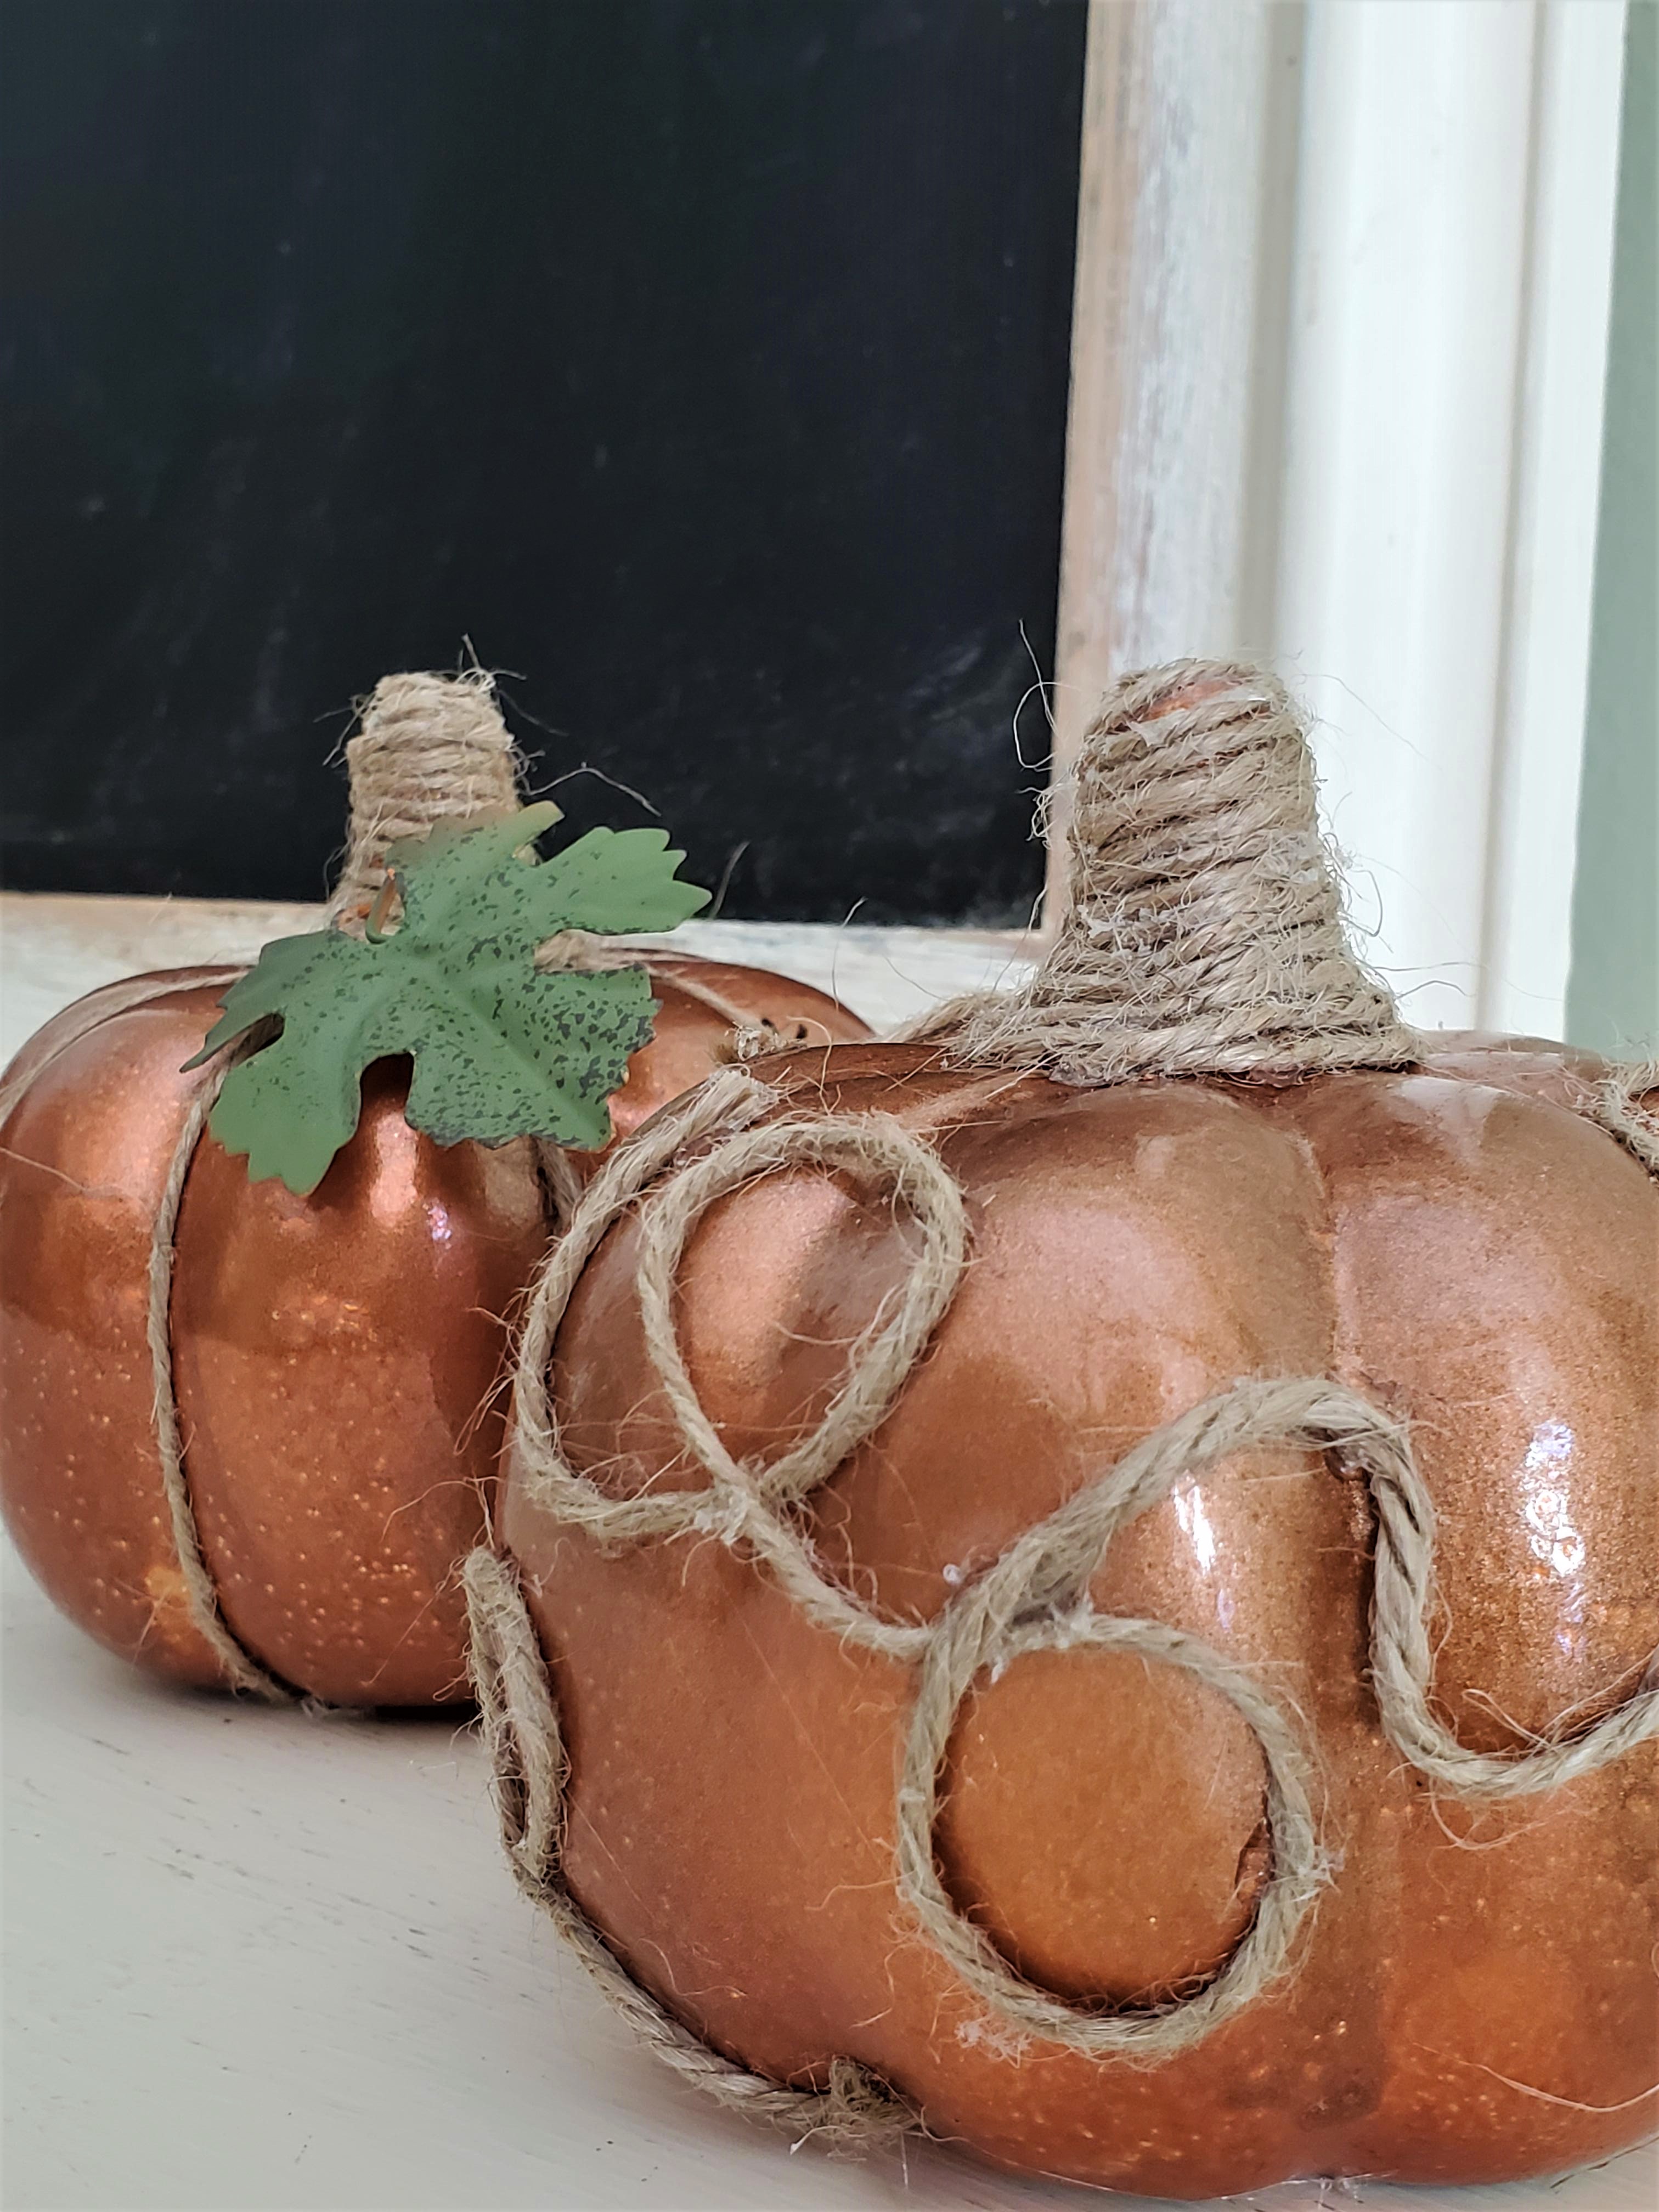
Rustic Copper Twine Pumpkins
When hubby first saw these he gave them a big thumbs up. They are the perfect combinations of high end copper and rustic appeal. You could of course, make these pumpkins any metalic or regular colour that you prefer.
Supplies You Will Need
- Ceramic Pumpkins
- Rustoleum Universal Hammered Copper Spray Paint (*Optional)
- Jute Twine
- Hot Glue and Glue Gun
- Scissors
- Metal Leaves (*Optional)
How to Make Rustic Copper Twine Pumpkins
- Spray paint the pumpkins with the copper spray paint.
- Using your hot glue attach the twine to the pumpkins. I did this in two different styles. Play with this a bit. You are in charge of your DIY so pick a pattern that you like. In the end, I went with straight lines down the indents of the pumpkin and on the other one I went with loops and whirls.
- Once again, pull out that hot glue gun and jute twine. Start at the base of the pumpkin stem and placing small dollops of hot glue as you go, wrap the twine up the stem until you reach the top. Circle the twine around the tippy top and affix it with the hot glue.
- Optional: I had one of Dollar Tree’s metal pumpkin yard picks. Using wire clippers I snipped off a leaf and added it to one of the copper pumpkins with a dab of hot glue.
NOTE: This 1st step is completely optional but I personally wasn’t into the original shiny copper colour. I wanted them to be more rustic and matte in appearance. I also wanted them to work with the other fall copper decor centerpieces that I had created.
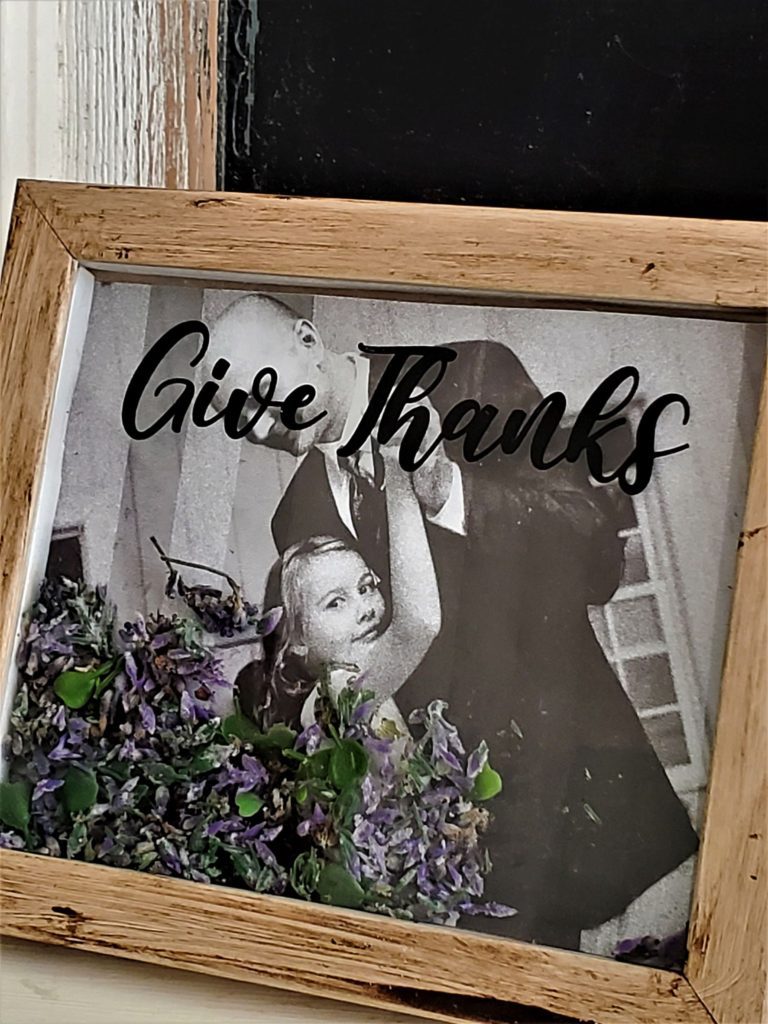
Give Thanks Picture Frame
I love that the writing that comes on these box frames are already perfect as is. I preferred the Give Thanks saying but there are other options that you may like more.
Supplies You Will Need
- Give Thanks Box Picture Frame
- Black and White Photograph
- Faux Lavender Stem
- FolkArt Wax Home Decor Chalk Paint in Antiquing
- Paint Brush
- Scissors
How to Make Give Thanks Picture Frame
- Remove the back of the picture frame and take out the picture that comes in the frame. Put this aside, you are going to need it for the next project.
- Using the wax and paint brush, darken the picture frame.
- NOTE: This step is optional but I wanted the frame on this picture to be darker than the lighter original colour it came in.
- Replace the original fall image with a picture of your beloved family.
- Cut the faux lavender flowers off of the stems and fill the inside of the frame. Place the back of the frame back on and you are done.
So simple and pretty, don’t ya think? Can also be used all year long if you use the frame with the Give Thanks saying on the front.
NOTE: The picture I ended up using wasn’t quite perfect. The image needs to be closer to the bottom with more free space above. I went with this because I was running out of time and want to get this post up. I recommend that you pay a little more attention to this crucial detail so that the end result is perfect.
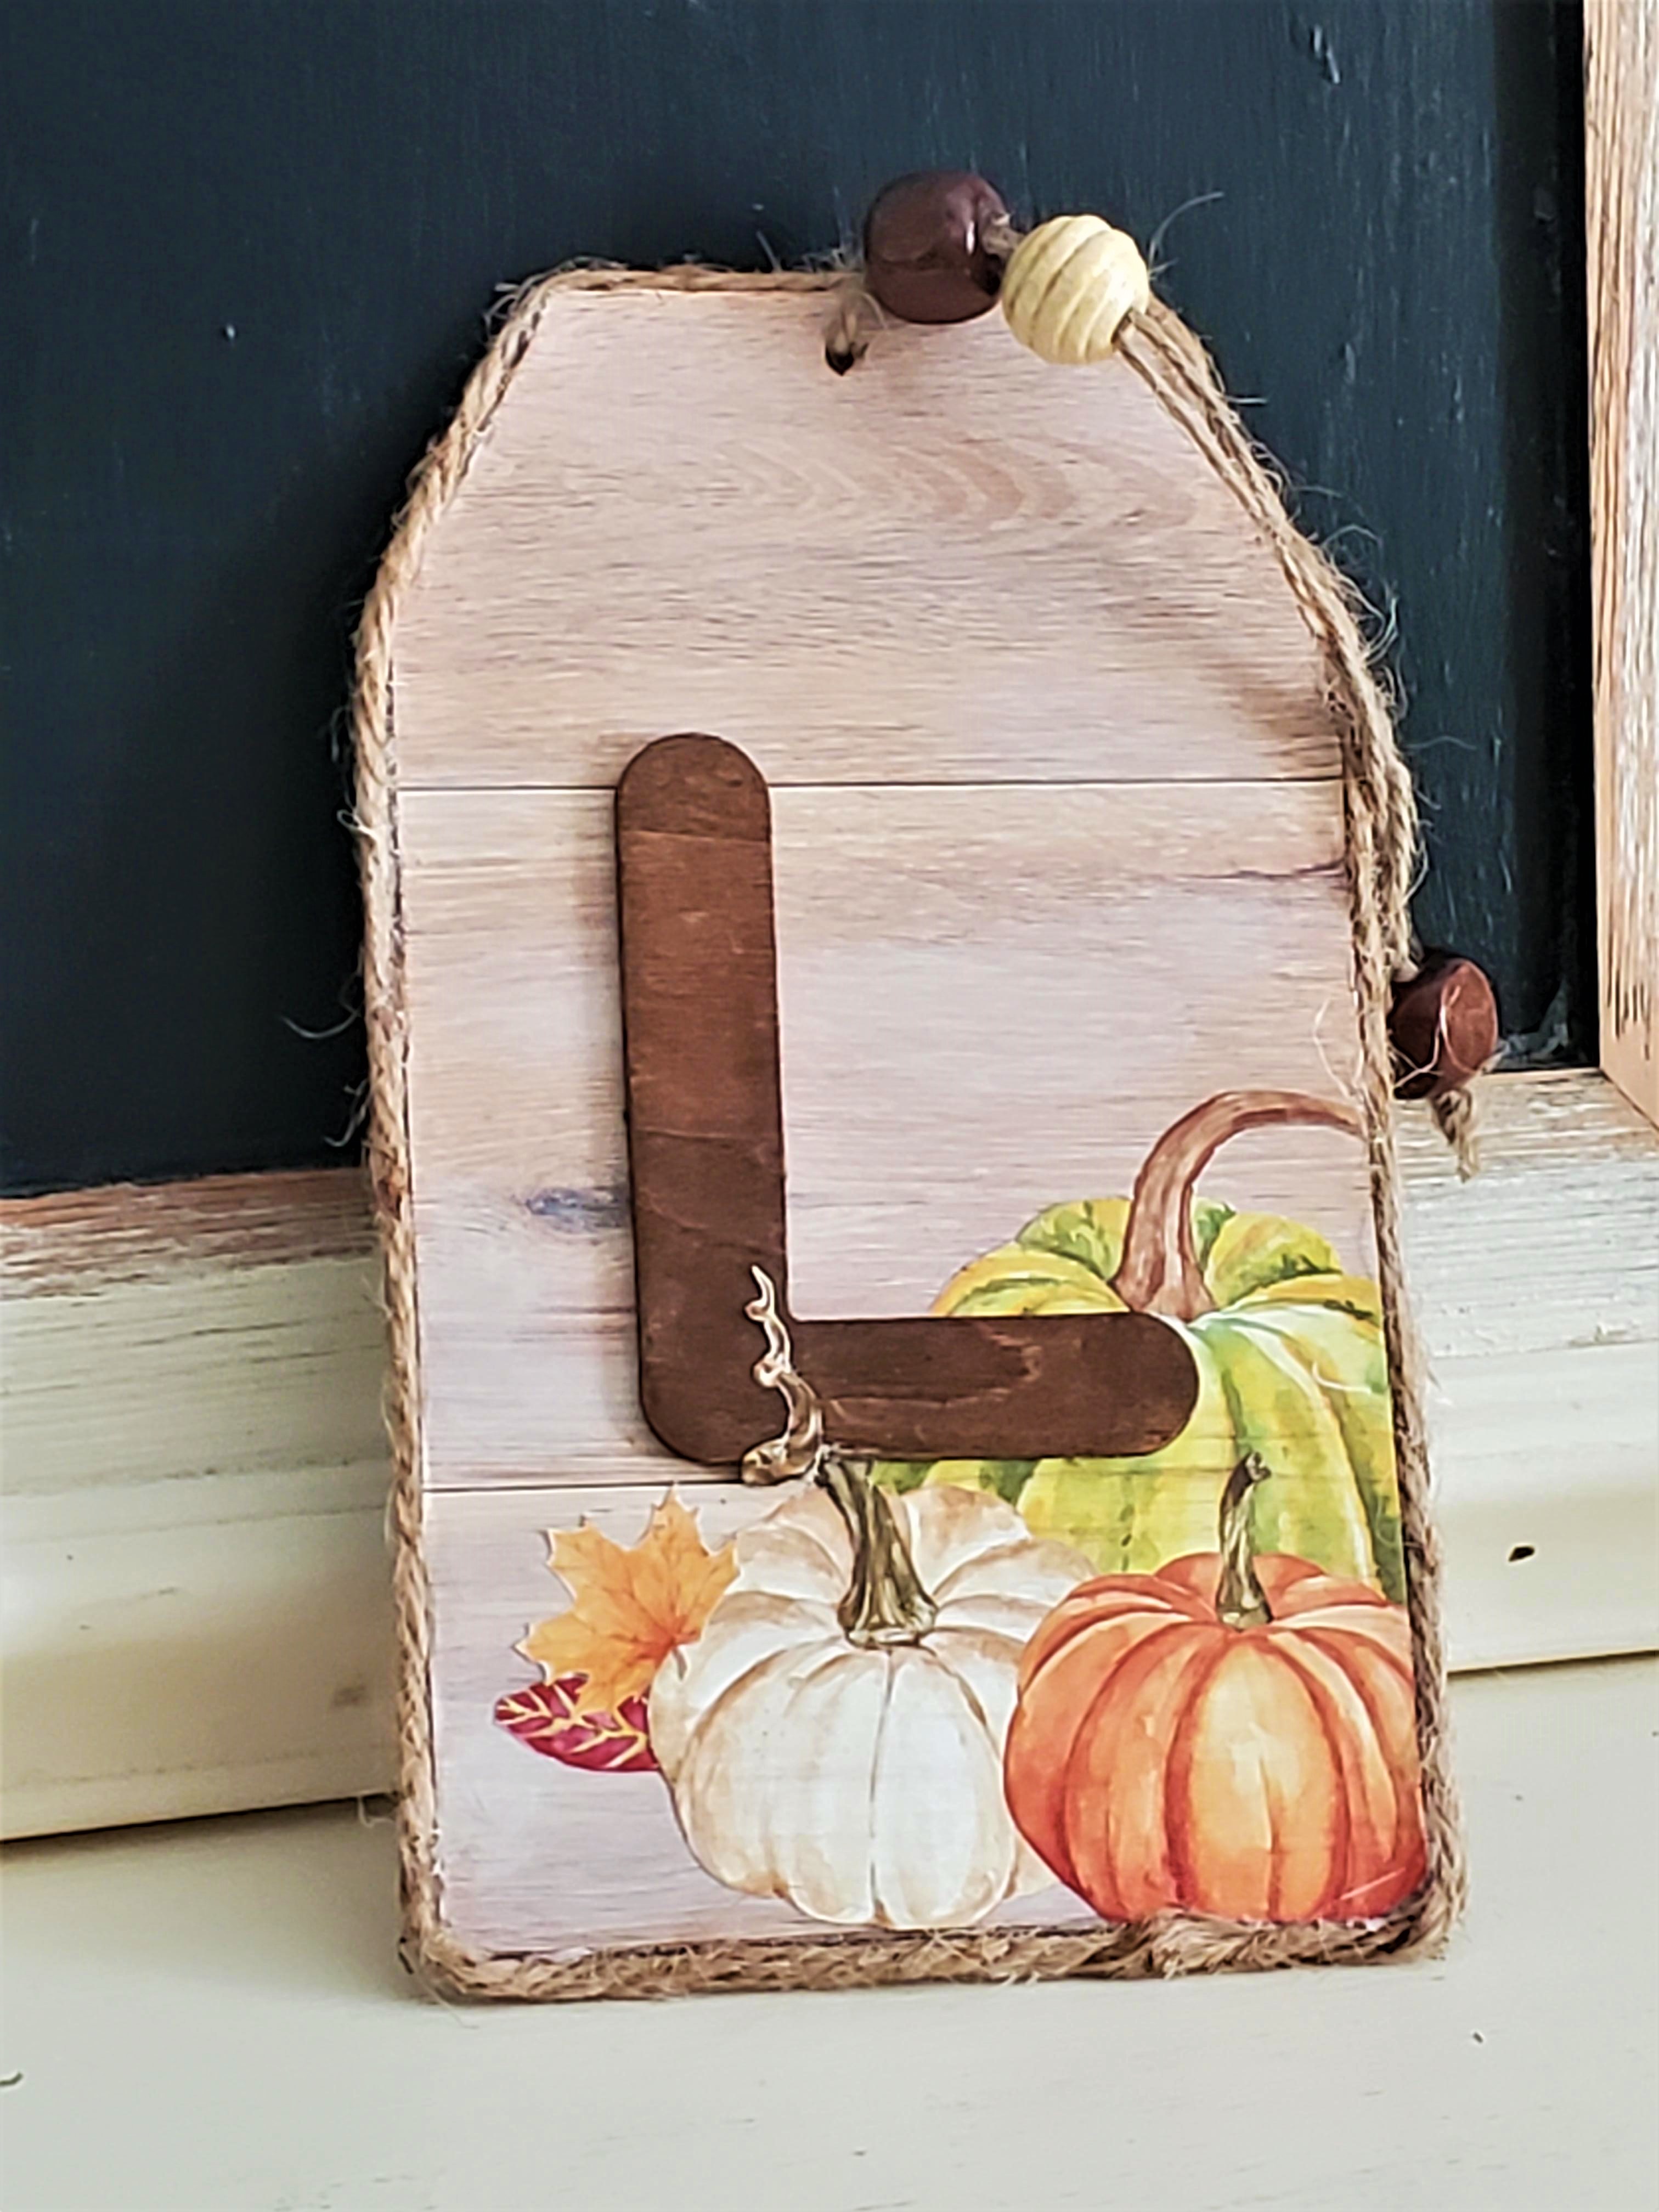
Personalized Fall Tag
I am a sucker for anything that is personalized. This wood tag is no exception. I got the ideas from similar tags I saw for sale at Michael’s. I just prefer my $2.50 price tag compared to their $7 one.
Supplies You Will Need
- Wooden Tag
- Fall Image (I used the photo that I removed for the Give Thanks picture frame)
- Adhesive Roll in Wood Grain
- Wooden Letters
- FolkArt Chalk Paint in Milk Jug
- Chip Brush
- Paper Glue
- Scissors
- Jute Twine
- Wooden Beads
How to Make Personalized Fall Tag
- Trace the tag onto the back of the wood grain adhesive and then attach it to the back of the wood tag.
- I decided to distress and lighten the look of the wood adhesive by lightly painting on some off white chalk paint with a dry chip brush.
- Cut out the fall images from the image you took from the Give Thanks picture frame we used in the last project or from any other fall image you like. Glue these onto the tag.
- Using the wax, darken the wood letter. This step is optional but I find that it brings out the wood grain and the darker wood stain matches much of the decor I will be using this year. But hey, if you prefer your wooden letter in the lighter wood colour or even painted then you should do that.
- Hot glue the wooden letter onto the middle of the wood tag.
- Using the tip of a pencil poke a hole through the top of the tag. Thread the jute twine through the hole. Add a couple of wooden beads then tie a knot near the top. Add another wooden bead and then again knot the twine.
This charming personalized fall tag would look great as part of tray decor, hanging off a fall wreath, or just as a wall hanging.
PRO TIP: To add a touch of interest and detail try gluing a portion of the image onto the wooden letter. Like I did with the pumpkin stem climbing up the letter L.
Fall Pumpkin Wood Crate
This DIY can be made to look exactly as I made it or you can make it even simpler by using any wooden crate that you see at the dollar store or from your own home collection.
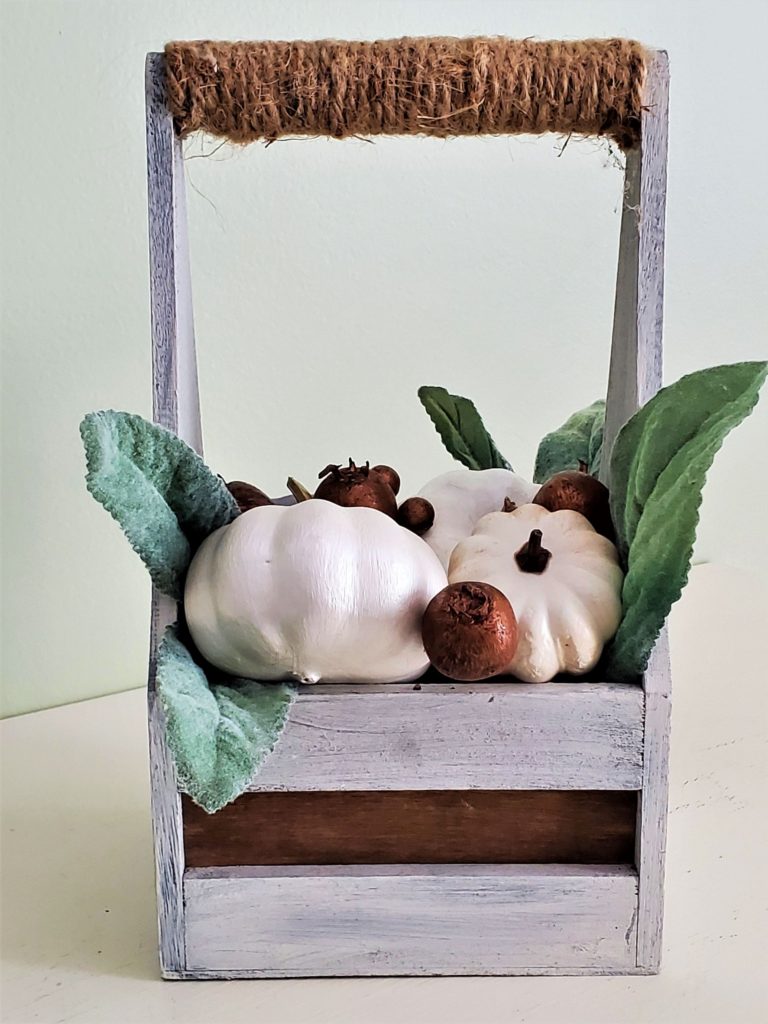
Supplies You Will Need
- Wooden crate (The one I am using is one I made in my faux succulent post. All the supplies came from *Dollarama, Check it out if you want to make the exact same one.)
- Plastic Pumpkins
- Clip on Plastic Pumpkins
- ArtMinds Chalk Paint in Porcelain
- Paint Brush
- Faux Lambs Ear (Reminder: This is the only thing that I used in any of these DIYs that didn’t come from the dollar store. I bought these at Michaels.)
- Faux Rose Hips
- Faux Berries
- Rustoleum Spray Paint in Hammered Copper
How To Make Fall Pumpkin Wood Crate
- Start by painting the plastic pumpkins with the chalk paint. Let dry.
- Spray paint the berries and rose hips with the copper spray paint. Let dry.
- If you are not using the DIY wood crate I used in this decor piece then you may need to fill the bottom of your wood crate with foam or floral foam so that the pumpkins sit higher up in the crate.
- Add the lambs ear or other greenery you selected from the dollar store.
- Add the copper rose hips and berries.
A simple but stunning table top decor piece that looks like you bought it for a lot more at a home decor store.
Copper Embellished Pumpkins
These DIY high end fall decor pumpkins are so stunning but so silly simple to make. I have 2 right now but I think I am going to have to make a couple more.
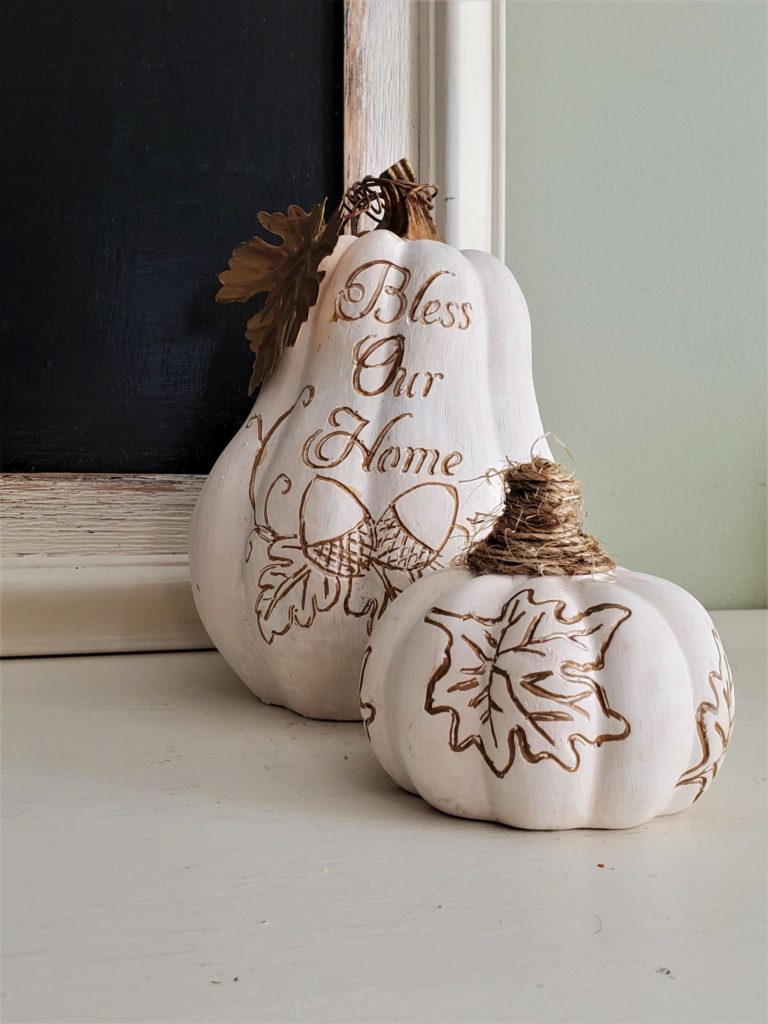
Supplies You Will Need
- Ceramic Pumpkins in Small or Large
- Copper Chalk Marker
- Jute Twine
- Hot Glue Gun and Hot Glue
How To Make Copper Embellished Pumpkins
- If needed, first paint the ceramic pumpkin. The one I bought came in off white so I skipped this step.
- Using the copper chalk pen trace the indented patterns.
- Using the hot glue and jute twine, start at the base of the pumpkin stem, and adding dollops of hot glue to attach, wrap the twine up the stem until it is completely covered.
And that’s it. So simple but so elegant and they look great clustered with the rustic copper twine pumpkins. The perfect example of easy DIY Fall Decor
NOTE: I made the larger pumpkin in the picture last year. The pumpkin was bright orange and a bit gaudy for my taste so I painted it off white and added the copper embellishments. This year I decided to add the smaller one and show you how I did this.
Sweater Mug
This DIY is so much fun and it all starts with a sock. Socks have so many uses for DIYing and is among one of my favourite 25 unusual Dollar Store craft supplies that I like to keep on hand.

Supplies You Will Need
- Mug
- Sock
- Buttons
- Hot Glue Gun and Hot Glue
- Scissors
How To Make A Sweater Mug
- Cut the top of the sock off with the scissors. Make sure that you leave enough length that it will cover the entire mug.
- Slide the sock over the mug and find the spot where the handle will have to go. Cut out the hole for the handle in a long thin rectangle.
- Flip the sock inside out. Fold the material at the top, bottom, and handle hole and hot glue it down so that when you flip the sock back right side out the edges will be nice and clean.
- Using the hot glue again, attach the buttons to the front of the sock.
- Slide the sock over the mug.
And there you go! A practical and attractive way to enjoy all of those hot, fall beverages.
Fabric Autumn Leaf
As soon as I saw this leaf wreath frame I knew I need to have it. I just didn’t know what I was going to do with it. I looked around to see what others had come up with but still came up with nothing. So I slept on it and then suddenly I had it. This DIY looks especially beautiful hanging in front of a window. I hope you like it!
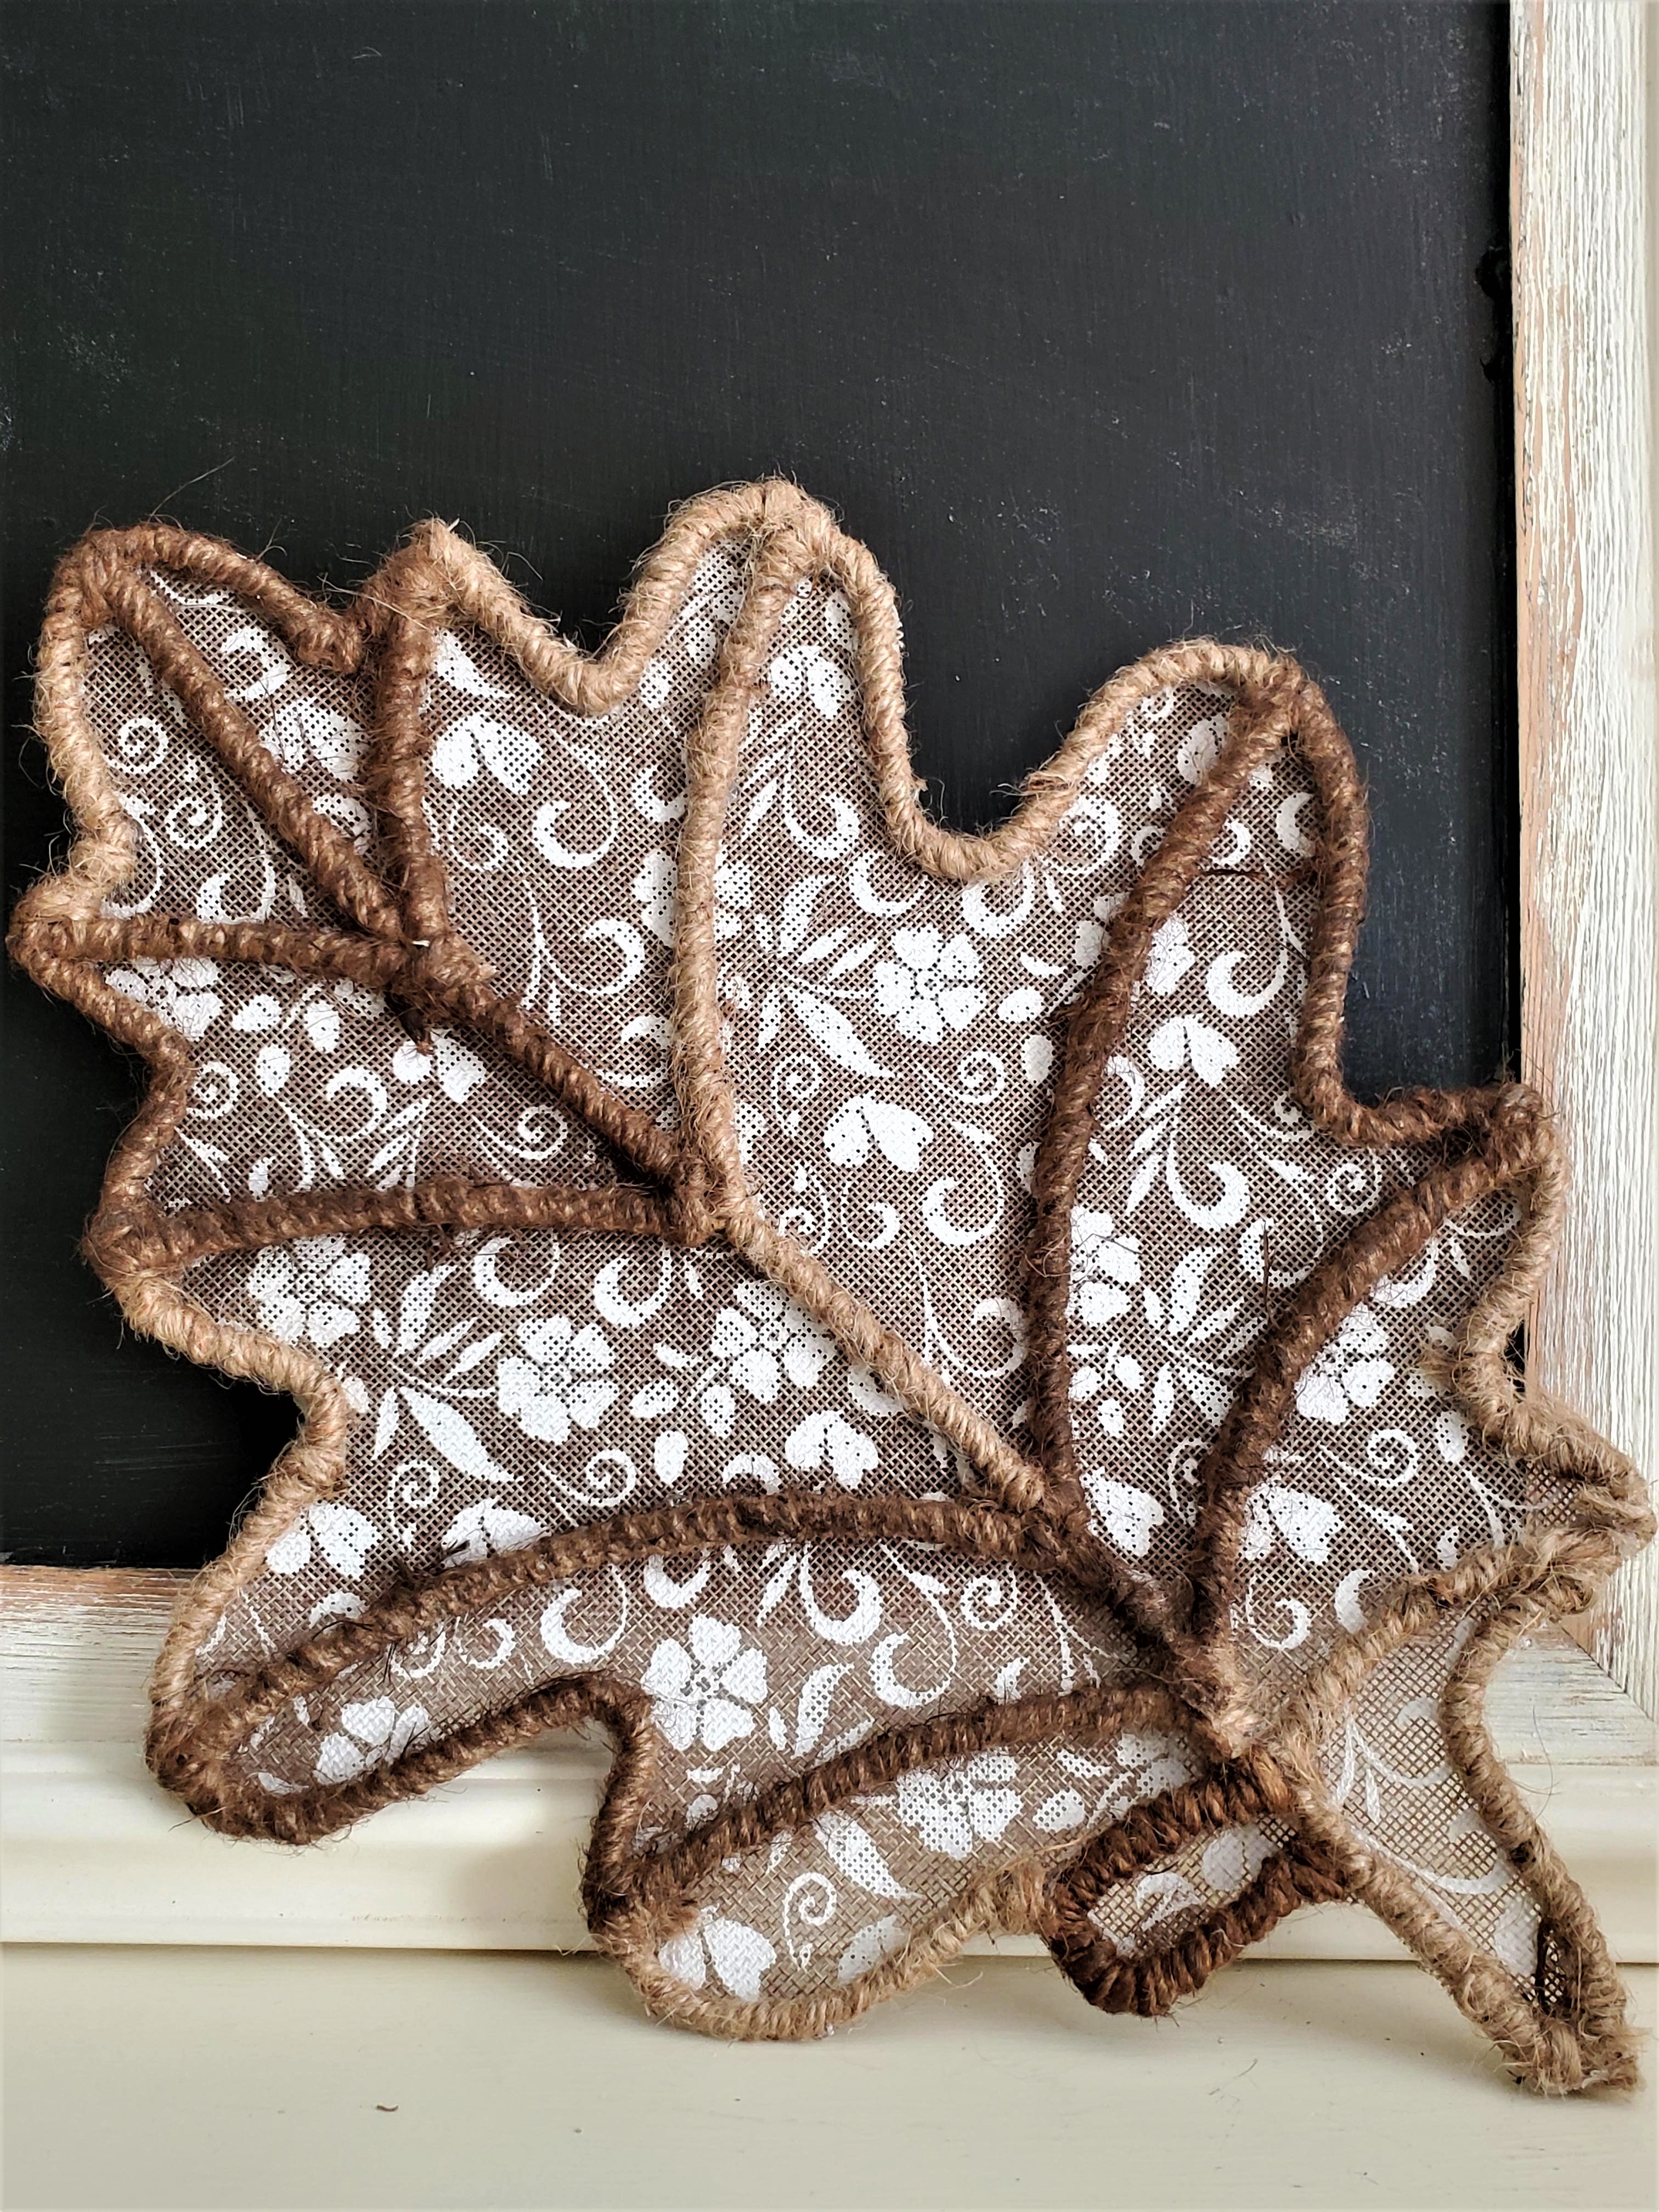
Supplies You Will Need
- Wire Leaf Wreath Frame
- Jute Twine
- FolkArts Wax in Antiquing
- Stencil Paint Brush
- Hot Glue Gun and Hot Glue
- Jute Roll
- Scissors
How To Make Fabric Autumn Leaf
- Start by wrapping the tip of the twin around the bottom of the leaf form and hot gluing it down. Wrap the twine around the frame.
- Using the wax, darken sections of the twine wrapped leaf so that there are two colours in the leaf.
- Hot glue the leaf onto the jute roll. I found it easiest to start at the bottom and glue down section by section until the whole leaf frame is attached to the jute roll. Cut the leaf out and you have a simple and attractive leaf decor. The options for the ways you could use this gorgeous leaf is almost endless.
PRO TIP: I found it easiest to attach the twine to the frame section by section. Just use the hot glue to start and finish off each section.
Framed Pumpkin Patch Sign
I think this is my favourite out of all of these DIY high end fall decor pieces. It is so lovely in its simplicity but the details take it from dollar store to high end.
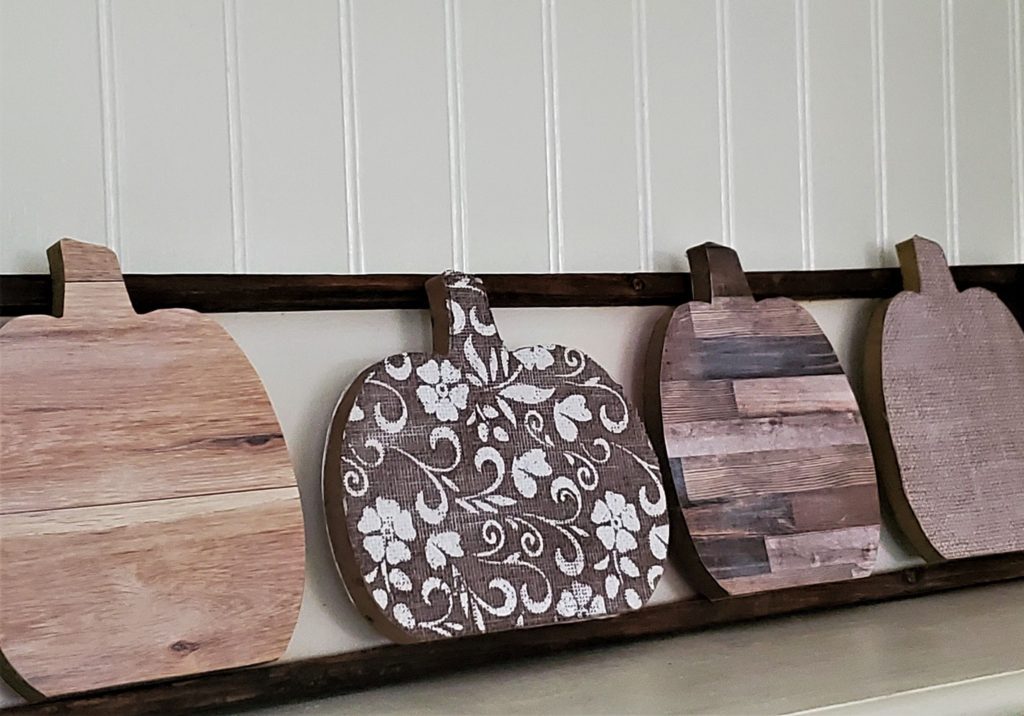
Supplies You Will Need
- Long Dollar Store Particle Board Sign
- Wood Pumpkins
- Tumbling Tower Blocks
- Wood Glue
- FolkArt Chalk Paint in Milk Jug
- Wood Grain Adhesive Roll
- Craft Paper (I went with dark wood board and burlap.)
- Paper Glue
- Mod Podge
- Paint Brush
- Wood Plant Stakes
- ArtMinds Wax in Antique
- Paint Brush
- Miter Box and Saw
How to Make Framed Pumpkin Patch Sign
- Remove the twine and staples from the back of the sign. Fill in any holes with wood filler. Paint the back of the dollar store particle board sign with 2 coats of Milk Jug chalk paint and allow to dry.
- Using the wooden pumpkins trace the pumpkins onto each of the paper options.
- Use a dry paint brush and a bit of the off white Milk Jug chalk paint to distress and lighten each of the pumpkin fronts.
- Hot glue the blocks onto the middle back of each wooden pumpkin.
- Stain the wooden plant stakes with the wax in Antique and allow to dry.
- Using your miter saw cut the wood stake so that the ends are cut at a 45 degree angle.
- Using the wood glue the wood stakes to the inside edge of the frame. Glue the ends together as well.
- Wood glue the pumpkins to the sign.
Voila! Simply divine. I think it is the perfect combination of fall and farmhouse rustic. What do you think?
No Glue Fall Wreath
I love making no glue wreaths and have done it more than once for this blog. They are always so easy and turn out so pretty and this one is definitely no exception.
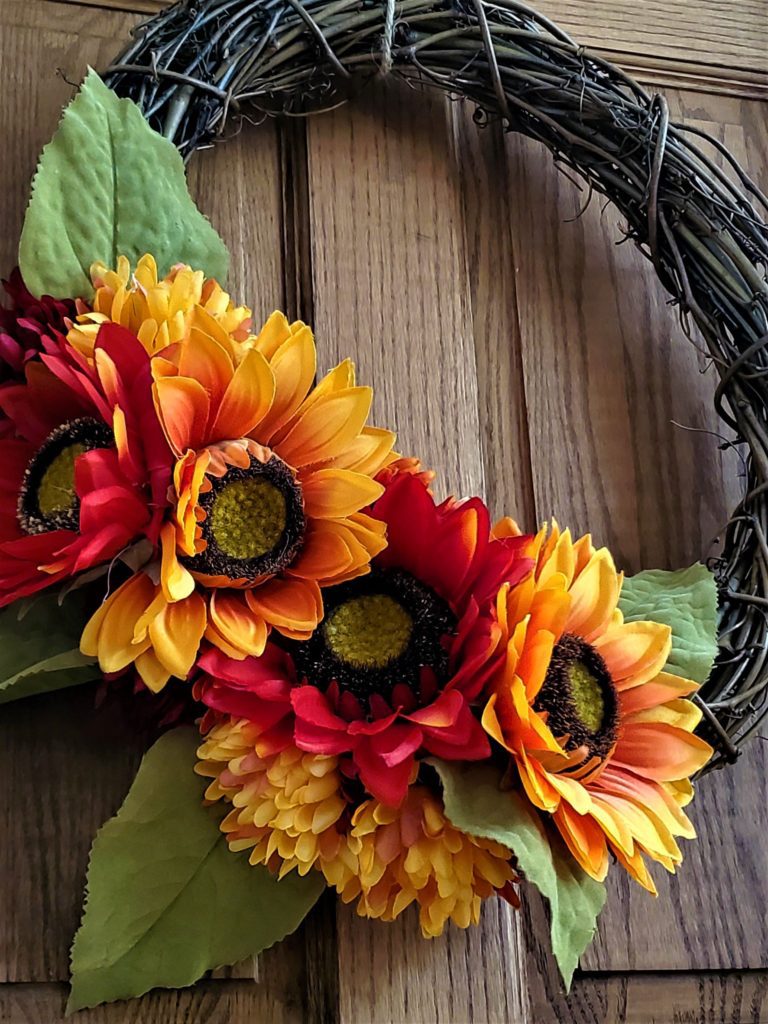
Supplies You Will Need
- Grape Vine Wreath
- 4 Faux Large Sunflowers
- 3 Stems of Faux Fall Coloured Chrysanthemums in bright yellow, orange, and burgundy
- Wire Clippers
- Jute Twine or Ribbon
How To Make No Glue Fall Wreath
- Clip the sunflower stems so that you are left with the bloom and a few inches of step. Do this to the chrysanthemums as well.
- Starting with the 4 large sunflowers, slip the stems into the grapevine wreath. Carefully sliding the stems in between the branches of the wreath form. Add the chrysanthemums to fill in the spaces around the sunflowers.
Hang the wreath with some jute twine or ribbon.
Such a simple but stunning way to dress up the front door.
Jenny’s Finishing Thoughts On DIY High End Fall Decor
Fall decor makes the home look cozy. It envelopes you in a sense of calm and comfort. Making your own DIY high end fall decor doesn’t have to be complicated or time consuming. A quick trip to the dollar store, a warm mug of Pumpkin Spice Latte and a Sunday afternoon can result in the most spectacular fall decor pieces.
Please remember that all of my DIY tutorials can be switched up to match your decor. Paint things so that they match your style, switch up elements that you are more attracted to (like apples instead of pumpkins), or go with a metallic look that excites you. Make these DIYs your own and then please share these ideas with me. I would love to hear about the fall decor you are making.
Do you tend to decorate for fall and then for Halloween or are you more likely to focus on one and not the other? If so, which do you like decorating for the most? Personally, I am an all or nothing kind of gal. So no surprise that I like to decorate for both.
Did you find this post helpful or inspirational? Save This Pin to your Fall Decor board on Pinterest